How to boot into Windows Recovery Environment Mode in Windows 11 & 10

Do you looking for a working method to boot into Windows Recovery Environment or to enter advanced recovery mode in windows 11 or windows 10?
Windows Recovery Environment is an advanced startup mode with advanced boot options in windows 11, windows 10 and older operating systems. It can be used to repair black screen or blue screen boot failures, doing system restore, doing a system reset, booting in safe mode, changing windows startup behavior and many more troubleshooting options.
On this topic, I will show you three different methods to boot into Windows Recovery Environment (WinRE) in windows 10 or windows 11, so you can select a suitable method according to your situation.
The first method will show you how to restart your running windows into recovery mode, the second method will show you how to enter windows recovery from BIOS, or from blue screen while booting, and the third method will show you how to boot windows recovery environment from a DVD or USB pen drive.
So you can try the first one if you have a healthy and working windows with enabled WinRE, while the second and third methods will help you to repair corrupted operating system or to restore your files if the computer failed to boot normally.
It’s worth noting that the Windows recovery Environment should be enabled in the computer, otherwise, you will need a Windows Installation Media such as DVD or USB drive in order to do that.
See how to enable Windows Recovery Environment in running windows or from Recovery Mode while booting from a Windows Installation media if the windows recovery environment not working or disabled in your computer.
- FIRST METHOD: HOW TO REBOOT INTO ADVANCED STARTUP OPTIONS FROM DESKTOP IN WINDOWS 10:
- SECOND METHOD: HOW TO BOOT INTO WinRE FROM STARTUP WITHOUT WINDOWS INSTALLATION MEDIA (WIM):
- THIRD METHOD: HOW TO BOOT INTO WINDOWS RECOVERY ENVIRONMENT USING BOOTABLE USB OR DVD DRIVE:
- The graphical Difference in CMD When boot With or Without USB drive:
- VIDEO:
FIRST METHOD: HOW TO REBOOT INTO ADVANCED STARTUP OPTIONS FROM DESKTOP IN WINDOWS 10:
1.1. To reboot into Windows Recovery Environment, do the followings:
1.1.a. Press and hold the Shift key from Keyboard
1.1.b. Right-Click on Start icon and select Power option
1.1.c. Select Restart option while holding Shift key down
Now, you should be landed on the main menu of the Windows Recovery Environment.
What are the available options in advanced boot menu?
- Reset this PC to reset windows 10 from boot to factory settings with options to keep or remove all your files.
- Advanced options menu, which includes:
- Automatic Start-up repair to fix problems that keep Windows from loading.
- Start-up Settings to change Windows Start up behavior such as Boot in safe mode, enable boot into safe mode with command prompt, disable driver signature enforcement and early launch anti-malware protection, disable automatic restart on system failure.
- Command prompt to use it for advanced troubleshooting such as fixing or rebuilding boot files, editing registry, Removing bending updates and package uninstallation using CMD, Copy files from dead computer to a USB flash or to external hard drive using CMD, restoring system health, fixing disk errors and many more.
- UEFI firmware Settings to change BIOS settings in UEFI-based computer.
- Uninstall windows updates to remove recently installed quality or feature updates from windows.
- System restore from boot to restore windows to a restore point recorded on your laptop.
NOTE: When selecting some options such as Command prompt or System Restore, you will be asked to enter the password for the selected windows.
1.1.d. Change keyboard language to the default language of your windows.
1.1.e. If you have no password, just click on Continue option without typing anything.
1.1.f. If you have a password for the selected account, type it then click Continue button.
Enabling Windows Recovery Environment in running windows:
1.2. If you failed to reboot into advanced recovery mode, you have to enable Windows Recovery Environment as followings:
1.2.a. Type CMD into Search box and press Enter
1.2.b. Right-click on Command prompt and then select “Run as Administrator “.
1.2.c. Type the following command to see if the WinRE be enabled or not:
REAGENTC /INFO
If the windowsRE enabled, you will see “Enabled” in front of Status. If the recovery status disabled, you have to enable it as followings:
1.2.d. Type the following command and hit Enter:
REAGENTC /ENABLE
1.e. If the process done successfully, restart your computer and try resetting again.
1.2.f. If “reagentc /enable” command failed, read this topic to see how to troubleshoot that, as you may need to download WinRE file.
NOTE:
- f you see an error message saying that The Password is Incorrect, Try again, you have to boot from Windows Installation Media (WIM) and do what you want in the WRE, as you will not be asked to enter your password when booting from WIM.
- It’s worth noting that this issue is common only in some build numbers of Windows 10.
If the first method not helped or if the computer won’t startup properly, you have to try the next method to boot into Advanced Recovery Mode.
SECOND METHOD: HOW TO BOOT INTO WinRE FROM STARTUP WITHOUT WINDOWS INSTALLATION MEDIA (WIM):
2.1. To boot into Windows Recovery Environment without installation media, do the followings:
2.1.a. Turn off the computer completely
2.1.b. Turn it on again
2.1.c. When the Windows logo appears with a circle of dots, press and hold the Power key for 8 seconds or until the device turns off completely.
2.1.d. Repeat previous two steps until appearance of “Preparing Automatic Repair“.
2.1.e. Select Advanced options option and then click on Troubleshooting option
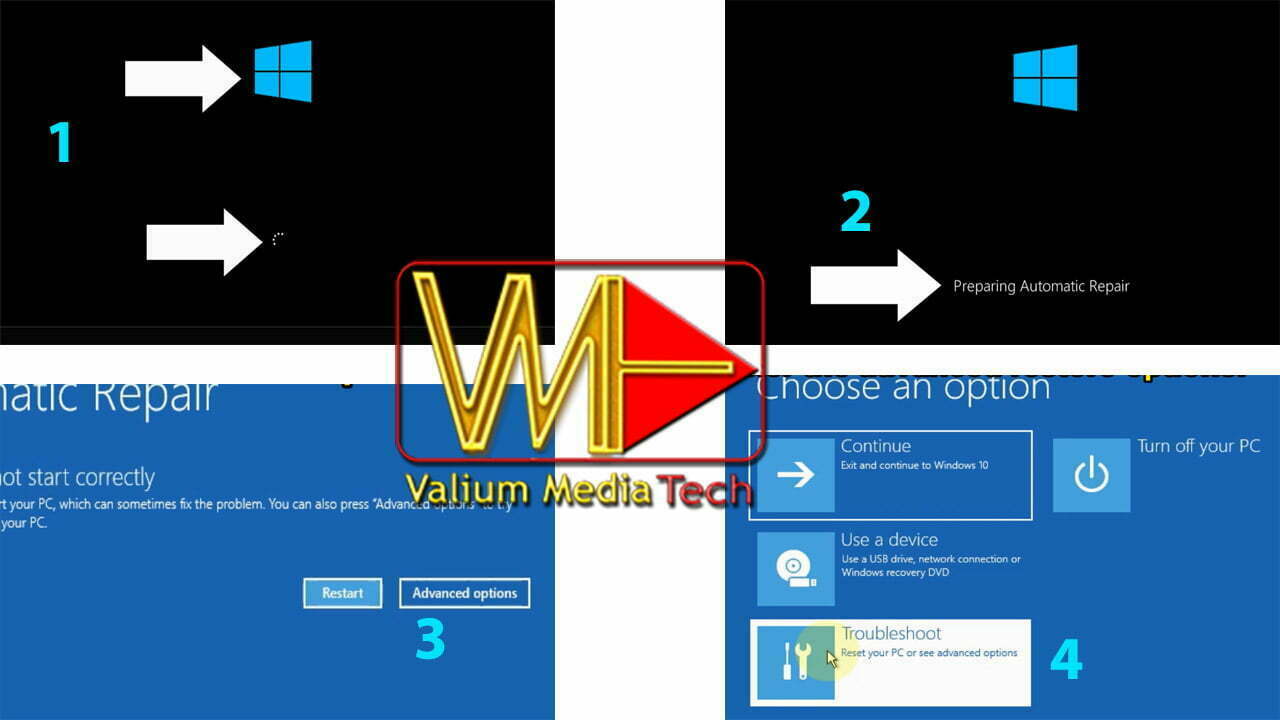
The device should be now in the Windows Recovery Environment.
2.2.a. There is another method to boot into Recovery by just pressing and holding Shift + F8 keys from keyboard after appearance of manufacturer logo, but it not works in some new computers.
2.2.b. You may need to press F8 key repeatedly while holding Shift key down.
2.2.c. If Shift + F8 keys not worked, you can try Fn + F8 keys instead. If the windows logo appears, that means you have failed to press the F8 key correctly, and you have to power off the computer completely then try again.
2.2.d. If both pair of keys not work, press F8 only or read the instructions from your screen to know which key that can bring you into Advanced Boot Options menu in your laptop. If you see only the key to open BIOS settings, make sure the fast or secure boot is disabled in BIOS settings if available.
This is the list of boot menu keys for most common laptop brands (Advanced boot options windows 10 & 11 keys):
- Acer: Esc, F12 or F9
- Asus: F8 or Esc
- Compaq: Esc or F9
- Dell: F12
- eMachines: F12
- Fujitsu: F12
- HP: Esc or F9. If Esc works, you may need to press F9 afterwards.
- Lenovo: F8, F10, F12 or Novo button.
- Samsung: Esc or F2 or F12
- VAIO: Esc, F10, F11 or Assist button.
- Toshiba: F12
I2.2.e. If nothing appears on screen or if the suggested keys not work, you have to search Google for the key that works for the specific model of your computer.
Some laptops have a specific key that can be used to open Boot menu. For example, Lenovo laptops have a specific key called Novo or OneKey recovery button. The Novo is either a small button or pinhole with a backwards arrow icon that resembles an upside-down U letter. This button usually locates next to the Power On button or next to the Charger port. When pressing this button, your laptop will open boot menu from which you can select to boot into System Recovery, Boot from the Windows Installation Media like DVD or USB or to open BIOS settings.
Remember that the Windows Recovery Environment should be enabled with intact files and partition in order for your PC to boot successfully into Advanced Recovery menu.
So if you failed even after pressing the correct key in the correct time, that means your recovery environment is either disabled or corrupted and you have to create a bootable USB in order to boot into Recovery Environment.
See how to create a bootable USB using your mobile or in another computer, and how to boot from that USB in order to enable Recovery environment.
THIRD METHOD: HOW TO BOOT INTO WINDOWS RECOVERY ENVIRONMENT USING BOOTABLE USB OR DVD DRIVE:
Before starting, you have to know and recognize some important information:
- There are two different types of firmware that guide operating system to start computer normally:
- The first one called BIOS or Legacy firmware and is present in most old computers.
- The second one called EFI or UEFI firmware and is present in most recent computers.
- Also some new UEFI laptops have options to support BIOS environment.
- In computers with BIOS firmware, the disk drive should be in an MBR scheme, and in computers with a UEFI firmware, the disk drive should be in a GPT scheme, otherwise, the computer won’t boot, and the disk drive will not appear in BOOT MENU.
- So, if you have a computer with BIOS firmware, the bootable USB should be in an MBR disk scheme in order to boot from it, and if you have a computer with UEFI firmware, the bootable USB should be in a GPT disk scheme in order to boot from it.
- In UEFI computers that support BIOS firmware, you can change boot mode to Legacy Support in order to boot from a USB that has a GBT disk scheme.
- The USB disk scheme can be changed when creating the bootable USB using Rufus or similar tool in computer, however, you can use Ventoy app in mobile to create a bootable USB that supports both MBR & GPT disk schemes at the same time.
3.1. To open Advanced Restore Options from Windows installation media (WIM) like DVD or USB, do the followings:
3.1.a. Power off the computer completely
3.1.b. Connect a Windows Installation Media to your computer
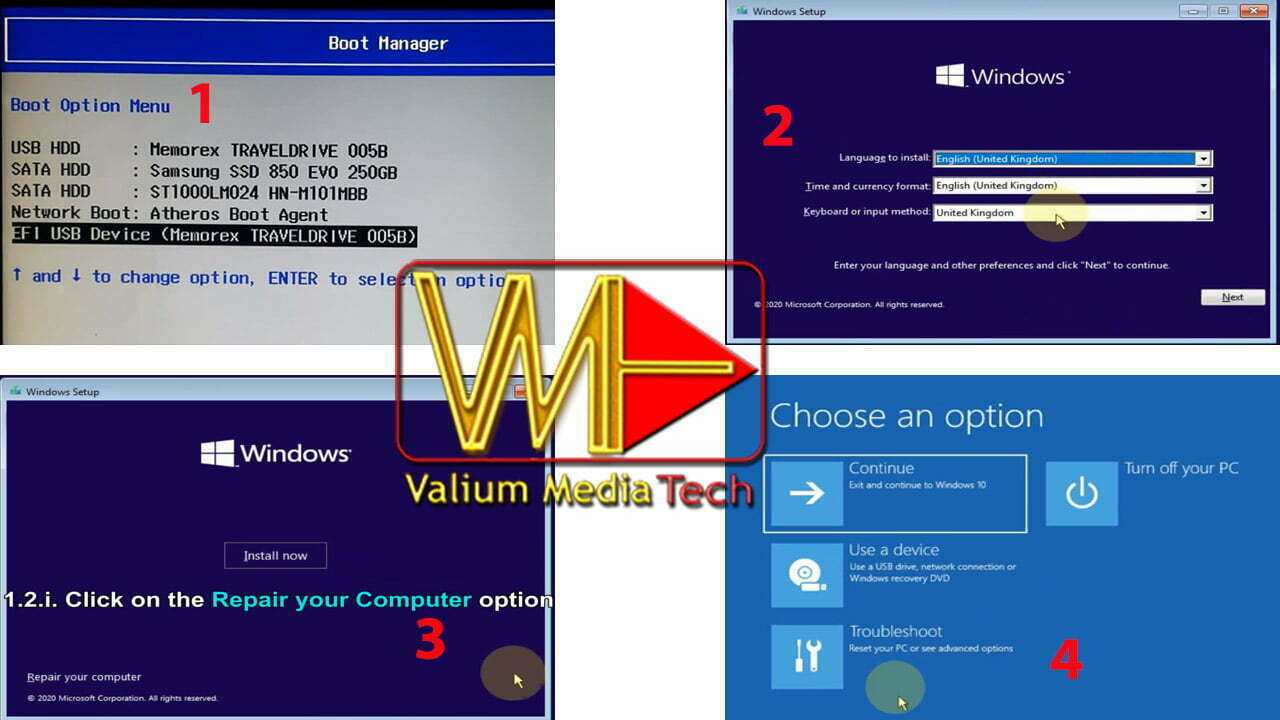
3.1.c. Power on the computer again.
3.1.d. Once you see the manufacturer logo, Press the F12 or another key from keyboard to enter boot menu.
List of common keys used to open Boot Menu:
These are the most common function (F) keys that can be used to open Boot menu for different brands:
- Acer: Esc, F12 or F9
- Asus: F8 or Esc
- Compaq: Esc or F9
- Dell: F12
- eMachines: F12
- Fujitsu: F12
- HP: Esc or F9. If Esc works, you may need to press F9 afterwards.
- Lenovo: F8, F10, F12 or Novo button. Other key combinations: Fn + F11.
- Samsung: Esc or F2 or F12
- VAIO: Esc, F10, F11 or Assist button.
- Toshiba: F12
3.1.e. Move to the DVD or the USB and then press the Enter button.
3.1.f. Once you see this message, press any key immediately to boot from installation media
3.1.g. If the computer failed to boot from the USB or you received an error message saying that “An operating system wasn’t found”, boot into boot menu and select the USB option that is flagged with EFI or UEFI USB device name.
3.1.h. There is a difference in location of symbols between US and UK keyboards.
So you have to change the keyboard language to your system language to avoid errors when typing some symbols and letters.
If not sure, see if you have a keyboard with symbols distributed like image below, change keyboard language to US layout.
And if you have symbol distribution like image below, then change keyboard to UK layout.
3.1.i. Click on Next button
3.1.j. Click on Repair your Computer option.
3.2. If you are unable to boot from windows installation media, power on the computer and press F2 key repeatedly to open BIOS settings:
List of common keys used to open BIOS settings:
This is the list of common keys used to open BIOS settings for different brands for desktops, laptops and notebooks:
- Asus = F9, F2 or Delete
- Acer = F2 or Del
- Dell = F2
- Hp = F10, Esc or F1
- Lenovo = F1, F2 or Nano Button
- Samsung = F2 or F10
- Sony = Assist Button, F1, F2, F3
- Toshiba = F1, F2, Esc or F12
- Compaq= F10
- Fujitsu= F2
3.2.a. Once you are on the BIOS menu, take a video for the entire BIOS settings using your mobile before doing any changes, so you can revert new changes back to previous settings once you finish troubleshooting.
3.2.b. Use arrow keys from keyboards to navigate between panels and items or read the instructions from the bottom of BIOS settings.
3.2.c. Locate secure boot or fast boot and disable it
3.2.d. Go to Boot tab and change USB Boot option to Enabled or on.
3.2.e. In some Asus or similar laptops with UEFI BIOS menu, you have to enable Compatibility Support or CSM mode, in order to disable Secure Boot.
3.2.f. In older computers, you have to change boot mode to Legacy support, then enable USB Legacy or any related settings if available.
3.2.g. If you are unable to open Boot menu on step number 3.1.d., you have to change the boot priority order so the USB takes the first position in the list.
Use F5 and F6 or follow the instructions from your screen to change the USB boot position to the top.
In Asus UEFI/BIOS utility and similar menus, you can drag and drop the USB drive in to the top of the boot list using you mouse.
3.2.h. Navigate to Exit panel and select, Save Changes option.
Also you can save changes by pressing F10 or similar key according to what you can see on screen of your BIOS menu.
Troubleshoot Booting from the USB:
If the USB drive not shown on the boot list, make sure that:
- The USB is not disabled in boot menu or any menu.
- The USB scheme is applicable to your disk scheme (i.e., MBR or GPT)
- The USB drive is not corrupted or unbootable
- In some cases, you have to save changes and reboot into BIOS settings in order to see the USB drive on the Boot menu.
- Also you can try to plug the USB pen drive to another USB port in your computer.
- Some mentioned settings may or may not be available in your computer, or may be available in other names rather than the mentioned names.
- Search for any of the following settings in BIOS setting and make sure it’s Enabled or set to On:
- CSM Legacy Support Legacy CSM Launch CSM
- If you have a UEFI/Legacy Boot option, set it to Both or Legacy Only.
The graphical Difference in CMD When boot With or Without USB drive:
- There are some graphical and other differences in the path of Command Prompt when booting into a recovery menu with or without Windows installation media.
- When booting from CD or USB drive, the CMD path will be:
- X:\Sources>.
- When booting without installation media, the path will be:
- X:\Windows\System32>
- This difference won’t affect the executing commands, however, the success rate of fixing startup issue issue is higher when booting from a Windows installation media like USB or DVD.
- When booting from CD or USB drive, the CMD path will be:
- When booting without installation media, you will be asked to choose the user profile. If you have two or more profiles, select the one with administrator access and then change the keyboard layout to English language.
- If you have a password for the selected profile, type it and then click on continue button, if there is no password, click on continue button directly.
VIDEO:
To see how do I get to Windows Recovery Environment from BIOS, or how do I boot into Windows 10 Recovery options from USB, you have to watch this video:

100% Working | How to Rebuild BCD in Windows 11-10 Auto CMD

How to Fix Encountered an Improper Argument in VideoStudio
