How to Fix All DISM & SFC Errors in Windows 10 & 11
On this topic, you will learn how to fix most common errors of SFC and DISM tools when trying to fix corrupted system files in windows 11, windows 10 and windows 8.
DISM stands for Deployment Image Servicing and Management, and is an administrative tool used from command prompt to accomplish many tasks in windows operating systems, such as, repairing corrupted system files, adding or removing windows components or features, editing Windows images and many tasks.
On other hand, the SFC stands for System File Checker, and it is an administrative tool that can be used to check files integrity or to repair system files in windows.
Read this topic to see how to run DISM and SFC using auto CMD file without errors.
BOOTING INTO ADVANCED RECOVERY ENVIRONMENT:
You have to boot your computer into Advanced Recovery Environment even if you are trying to use both tools in running windows.
1.a. HOW TO RESTART INTO ADVANCED RECOVERY ENVIRONMENT FROM RUNNING WINDOWS:
Before booting into Advanced Recovery Environment, check if the Recovery enabled or not:
- 1.a.1. Type “CMD” into search box
- 1.a.2. Right-click on Command Prompt then select, “Run as Administrator”.
- 1.a.3. Check Recovery Environment Status using this command:
- REAGENTC /INFO
- 1.a.4. If Windows recovery is disabled, search for WinRE.wim file using this command:
DIR /A /S C:\WINRE.WIM
- 1.a.5. If the file is available, enable recovery using this command:
REAGENTC /ENABLE
- If you are unable to enable Recovery, open this link to see how to enable it.
- 1.a.6. To boot into Advanced Recovery Environment from running windows, do the followings:
- 1.a.7. Click on Start icon and then select “Power” option
- 1.a.8. Press and hold “Shift” key from keyboard
- 1.a.9. Click on “Restart” while holding Shift key down
- 1.a.10. Select Troubleshooting option then select Advanced Options
- 1.a.11. open Commands prompt
- 1.a.12. If you have a password for your account, type it to login, otherwise, click “Continue” directly.
1.b. HOW TO BOOT INTO ADVANCED RECOVERY ENVIRONMENT FROM POWERED OFF COMPUTER:
1.b.1. To start your computer into Advanced recovery Environment without installation media, do the followings:
- 1.b.1.a. Power off the computer
- 1.b.1.b. Power it on again
- 1.b.1.c. Once you see windows logo with spinning dots, press and hold power button for 10 seconds to force stop the computer.
- 1.b.1.d. Repeat previous steps for three times until the computer Enter the Recovery Environment
- For more info about booting into recovery menu, open this link.
- 1.b.2. To start your computer into Advanced recovery Environment from USB pendrive, do the followings:
- 1.b.2.a. Plug in the bootable USB into your computer
- 1.b.2.b. Power on the computer and immediately press the f2 or another key from the following list to open Boot Menu:
- Acer: F12, F9 or Esc.
- Asus: Esc. or F8
- Compaq: F9 or Esc.
- Dell: F12
- Fujitsu: F12
- Hp: Esc. or F9
- Lenovo: F12, F8, F10, Novo Button or Fn+F11
- MSI: F11
- Razer Blade: F12
- Samsung: F12 or F2
- Sony: Assist Button, Esc or F11
- Toshiba: F12
Select the USB from the Boot list and press Enter to boot from the USB.
Read this topic for more details in how to boot from the USB
SOLUTIONS:
FIRST METHOD: GENERAL SOLUTIONS FOR MOST COMMON AND SIMPLE ERRORS:
The following commands will fix the simple errors, such as, system resource protection could not perform the requested operation when executing SFC /SCANNOW,
Or
Access is denied when executing DISM RESTOREHEALTH.
Type BCDEDIT and press Enter to determine Windows partition.
In my PC as you will see later, the D is assigned for windows partition.
Change CMD path to system32 folder inside windows partition using this command:
CD /D D:\WINDOWS\SYSTEM322.1. RESETTING WINDOWS SECURITY SETTINGS TO DEFAULT AND GRANT FULL ACCESS TO WINSXS FOLDER:
- 2.1.a. To reset system attributes of WinSxS folder to defaults, execute the following command:
ICACLS D:\WINDOWS\WINSXS\* /T /Q /C /RESET
- 2.1.b. Execute this command to grant full access to all administrator accounts:
ICACLS D:\WINDOWS\WinSxS\* /T /Q /C /GRANT ADMINISTRATORS:F- (Use Up arrow key from keyboard to explore previous commands)
- 2.1.c. Execute this command to reset windows security settings to default:
SECEDIT /CONFIGURE /CFG D:\WINDOWS\INF\DEFLTBASE.INF /DB DEFLTBASE.SDB /VERBOSE
- 2.1.d. Execute the following 2 commands to configure and to start trusted installer:
SC CONFIG TRUSTEDINSTALLER START= DEMANDNET START TRUSTEDINSTALLER
- 2.1.e. Now the system is ready to execute DISM and SFC commands without issues:
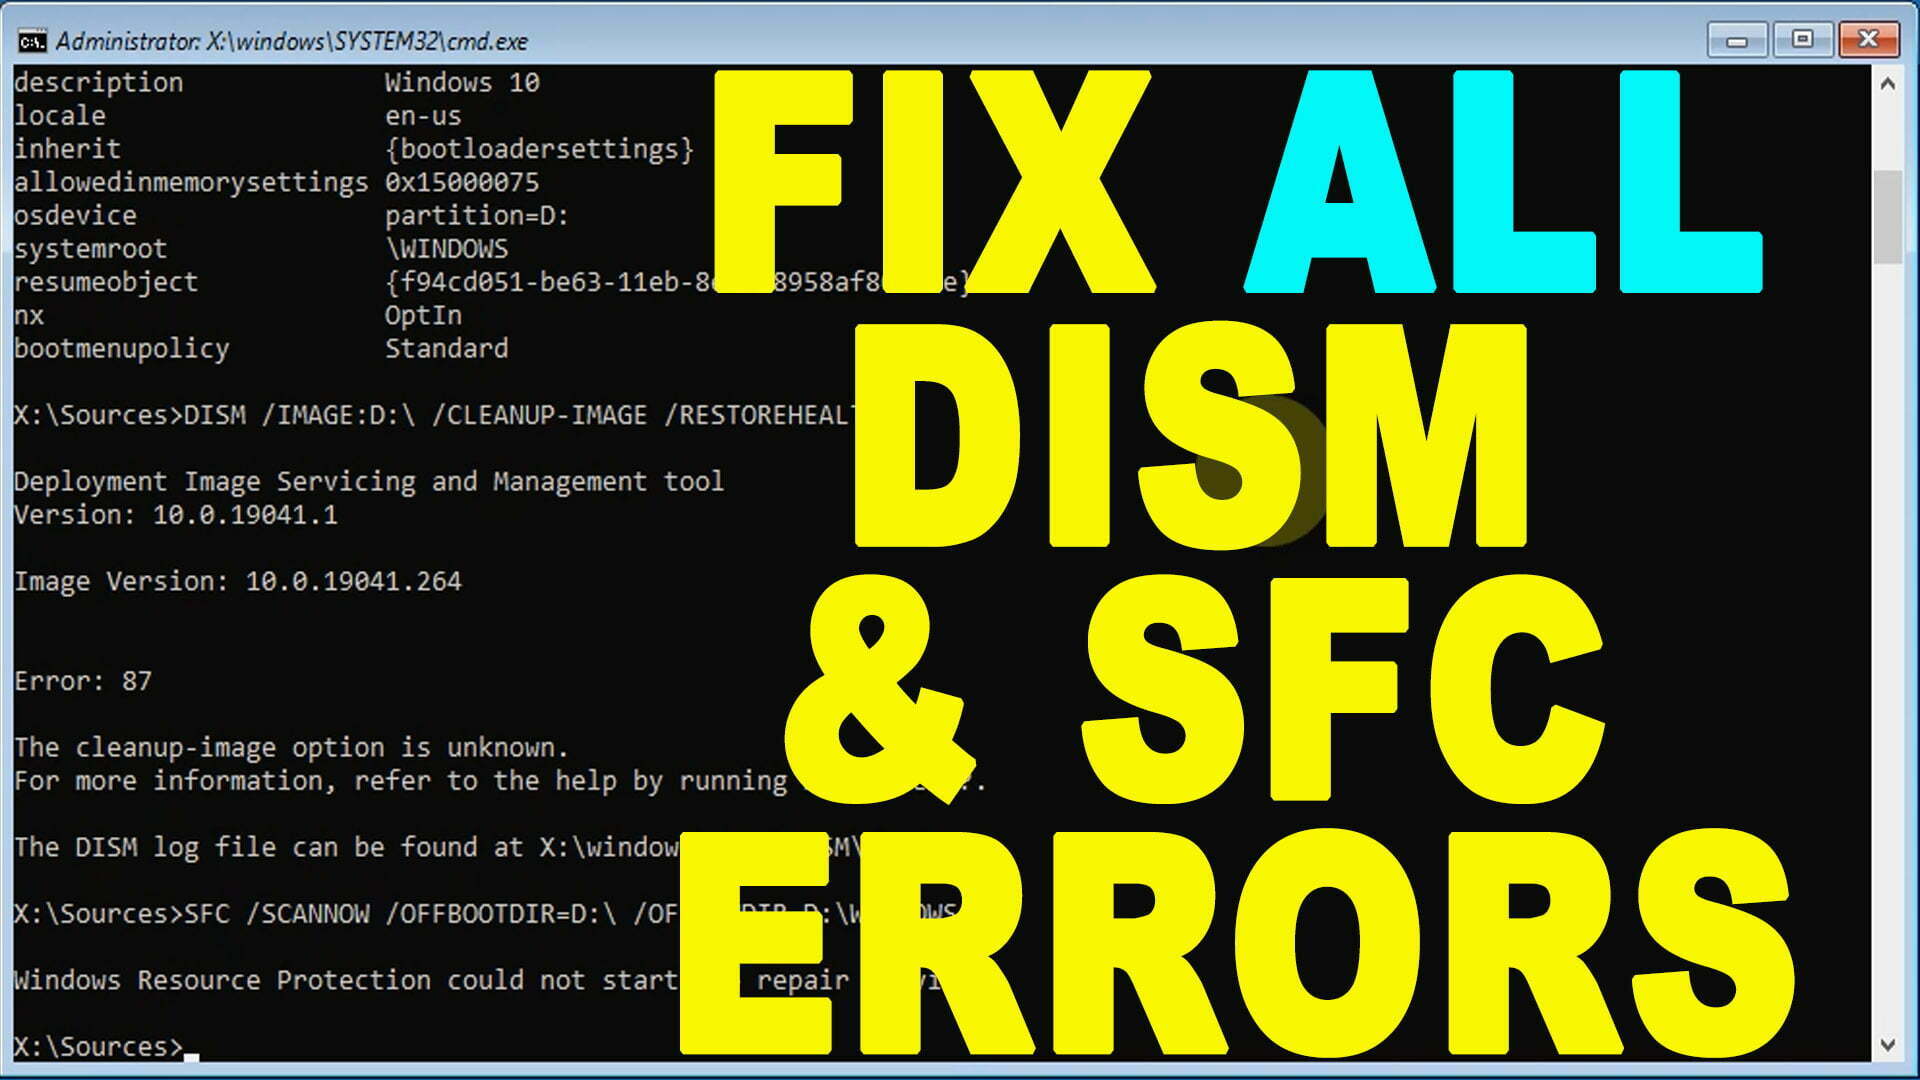
DISM /IMAGE:D:\ /CLEANUP-IMAGE /RESTOREHEALTHSFC /SCANNOW /OFFBOOTDIR=D:\ /OFFWINDIR=D:\WINDOWS
- 2.1.f. If you are booting from USB, add the USB as the repairment source to the DISM command as followings:
DISM /IMAGE:D:\ /CLEANUP-IMAGE /RESTOREHEALTH /SOURCE:WIM:H:\SOURCES\INSTALL.WIM:1 /LIMITACCESS- (Replace the D with the letter of Windows partition and the H with the letter of USB Pen drive)
SECOND METHOD: REPAIRING OR REPLACING WINSXS FILES MANUALLY:
If the first method not helped, the required files in the WinSxS may be corrupted or missing, especially if you get one of the following errors:
“DISM error: 87
The cleanup-image option is unknown”
Or
SFC SCANNOW, “Windows Resource Protection could not start the repair service“,
In this case, you have to boot from a bootable USB pendrive of windows image, in order to replace or to add the corrupted or missing files manually from the USB.
See how to create a bootable USB in android mobile or in another computer and how to boot from it.
2.2.a. Once you have booted from the USB, check the WinSxS folder as followings:
2.2.a.1. Type NOTEPAD and press Enter
2.2.a.2. Click on “File” tab then select, “Open” option
2.2.a.3. Click on this PC
2.2.a.4. Open Windows partition then open Windows folder
2.2.a.5 Right-click on the WinSxS folder and select, Properties.
As you can see, there are only 1200 files inside the WinSxS folder in my corrupted system, however, it must be at least 51000 files, which are the minimum files in a newly installed Windows 10 or windows 11.
CHECKING WINDOWS EDITION, VERSION, BUILD NUMBER AND DEFAULT UI LANGUAGE IN BOTH INSTALLED WINDOWS AND IN USB:
2.2.b. To check windows edition, version, build number and default language of installed windows, do the followings:
2.2.b.1. Navigate to this path to check windows edition:
D:\WINDOWS\SYSTEM32\LICENSES\NEUTRAL\_DEFAULT\
2.2.b.2. if there is a folder called professional, then the edition is Pro. For Windows 10 Enterprise you may have both Enterprise and Professional folders. In Home edition you will have only Home folder.
2.2.b.3. Back to command prompt and change CMD path to System32 folder:
CD /D D:\WINDOWS\SYSTEM32
2.2.b.4. Execute this command to identify windows version:
WINVER
In my PC, the edition of windows is pro, the version is 2004, build number 19041, and the default language is en-GB.
So the bootable USB should contain windows 10 pro, with the same or newer version and build number.
With en-GB as a default language, in order to replace the missing files in my PC.
2.2.b.5. Now, check the version of windows in the USB drive using this command:
DISM /GET-WIMINFO /WIMFILE:H:\SOURCES\INSTALL.WIM
As you can see, the version and build number are the same of installed windows.
2.2.b.6. Because the edition of installed windows on the PC is pro, so I will select the index number 6 in the USB to show its info using this command:
DISM /GET-WIMINFO /WIMFILE:H:\SOURCES\INSTALL.WIM /index:6
2.2.b.7. Let’s check the default UI language of installed windows by executing this command:
DISM /IMAGE:D:\ /GET-INTL
As you can see, the versions and default language are the same in both my computer and USB pendrive.
So, I will extract the index number 6 to replace missing files in the WinSxS folder as on the next steps.
2.2.c. To repair the corrupted or to add the missing files, do the followings:
2.2.c.1. Create new folder on the main directory of windows partition using this command:
MD D:\MOUNT
2.2.c.2. Extract index number 6 from the USB drive into Mount folder using this command:
DISM /MOUNT-IMAGE /IMAGEFILE:H:\SOURCES\INSTALL.WIM /INDEX:6 /MOUNTDIR:D:\MOUNT /READONLY
2.2.c.3. Check the WinSxS files in the mounted folder.
Press shift+F10 keys from keyboard to open new CMD window
2.2.c.4. Use notepad to go to mount folder.
As you can see, there are 51085 files, which are the baseline required files for windows to boot and run normally, however, 2.2.c.5. the number of these files may be doubled in your computer due to windows updates, especially if there is enough free disk space and you didn’t configure windows to remove the older versions.
2.2.c.6. Create new folder inside system32 folder using this command:
MD D:\WINDOWS\WinSxS.BACK
2.2.c.7. Copy WinSxS folder to the created folder using this command:
XCOPY /H /S D:\WINDOWS\WinSxS\* D:\WINDOWS\WinSxS.BACK\
This step is to make a backup copy for the existing WinSxS files, but before doing that, make sure you have enough free space on the windows partition, otherwise, delete unnecessary files or move them to external drive or to another partition in your computer if you have.
2.2.c.8. Now copy the files from MOUNT folder to WinSxS folder using this command:
ROBOCOPY D:\MOUNT\WINDOWS\WinSxS\ D:\WINDOWS\WinSxS\ /E /ZB /XN /XC
- /E : to copy subdirectories including Empty ones.
- /ZB : to use restartable mode; if access denied use Backup mode.
- /XN : to eXclude Newer files.
- /XC : to eXclude Changed files.
In my case, the existing files inside WinSxS folder where 1222 files only, so it takes about 16 minutes to copy new files, but it takes more than 15 hours to compare the sources files to the existing files before replacing or skipping them. So be patient, because it may take much more hours in your computer if you have more existing files.
2.2.d. If you can’t wait for this long process, you can try to rename your existing WinSxS folder, then copy the whole WinSxS folder from mount folder to Windows folder as followings:
2.2.d.1. Rename the WinSxS folder in your windows folder using this command:
REN D:\WINDOWS\WinSxS WinSxS.original
This step is to replace making a backup as on step number 2.2.c.7.
2.2.d.2. Then create new folder and name it WinSxS using this command:
MD D:\WINDOWS\WinSxS
2.2.d.3. After that, copy all WinSxS files and folders from mounted folder into new WinSxS folder using this command:
XCOPY /H /S D:\MOUNT\WINDOWS\WinSxS\* D:\WINDOWS\WinSxS\
2.2.d.4. Finally, execute the DISM and SFC commands again, or boot to your windows to see if the issue fixed or not.
2.2.e.1. If the issue not fixed, you have to use ROBOCOPY command to add the missing files. But before doing that, remove new WinSxS folder (if you have tried the previous command in step number 2.2.d.1) using this command:
RMDIR D:\WINDOWS\WINSXS\ /S
2.2.e.2. Then restore your original WinSxS folder using this command:
REN D:\WINDOWS\WinSxS.original WinSxS
2.2.e.3. After that execute the ROBOCOPY command and wait for it until complete.
ROBOCOPY D:\MOUNT\WINDOWS\WinSxS\ D:\WINDOWS\WinSxS\ /E /ZB /XN /XC
2.2.e.4. If you failed to remove or to replace the files in the WinSxS folder with this error message:
“The process cannot access the file because it is being used by another process”
You have to take the ownership of the folder using this command then try again:
TAKEOWN /F D:\WINDOWS\WINSXS /A /R /D Y
THIRD SOLUTION: ALTERNATIVE METHOD USING SAFE MODE:
2.3.a. If you are unable to open Command prompt from Advanced Recovery, open it from Safe Mode as followings:
2.3.a.1 From Advanced Recovery menu, open Start-up Settings, then click on Restart
2.3.a.2. Press on F4 or corresponding key to boot into Safe Mode.
2.3.a.3. Once you have boot into Safe mode, Type CMD into search box
2.3.a.4. Right click on Command prompt and select Run as Administrator.
2.3.a.5. Use the following form of commands:
DISM /ONLINE /CLEANUP-IMAGE /RESTOREHEALTHTH
SFC /SCANNOW
2.3.a.6. Notice that in Advanced Recovery Environment, we have to use the following forms of commands:
DISM /IMAGE:D:\ /CLEANUP-IMAGE /RESTOREHEALTHTH
SFC /SCANNOW /OFFBOOTDIR=D: /OFFWINDR=D:\WINDOWS
VIDEO:
For more details and to see how to fix DISM or SFC errors step by step, watch this video:
How to Stop BitLocker Asking for Recovery Key Every Boot or Startup Windows 10 & 11

The Selected Disk Has an MBR Partition Table. On EFI Systems, Windows Can Only be Installed to GPT Disks

Whenever I try to run a sfc scan or dism scan it takes time to initiate and halfway through the scan I get an error and it says file or directory is corrupt or unreadable. How do I fix this problem, should i try method 1?
Thank you for helping.
There is a new bat file that can be used to fix most common errors of DISM and SFC automatically. Read this topic to see how to use the auto bat file to run DISM & SFC without errors.
Good morning!
I’m from Brazil and I have a serious problem, as I can no longer restart my Windows 10, after a forced shutdown, when the system was almost finishing the shutdown. Your site seems to me to be the last of my hopes. In the line suggested below, index 6 appears, but in the line below, index 1 appears. Is there a typing error or not and if so, why?
“2.2.c.2. Extract index number 6 from the USB drive into Mount folder using this command:
DISM /MOUNT-IMAGE /IMAGEFILE:H:\SOURCES\INSTALL.WIM /INDEX:1 /MOUNTDIR:D:\MOUNT /READONLY”
Yes, there was an error and I have modified it; however, you can select index number one too, especially if you have windows home edition.
Also you can read this new topic with auto bat file to run DISM, SFC and CHKDSK without errors:
Each time I create a Windows 10 Bootable USB I end up with Install.ESD. How do I create a USB with Install.WIM?
You can create a bootable USB with Install.wim in your mobile as instructed on this topic:
https://vmtechs.net/how-to-create-bootable-usb-of-windows-11-in-mobile-supports-both-gpt-mbr/
Or read this topic if you want to create it on computer using Rufus tool:
https://vmtechs.net/how-to-create-windows-11-recovery-usb-free-download/#how-to-create-a-windows-11-recovery-usb-on-another-computer