How to Create Windows PE Media | CMD Batch to Make Bootable USB or ISO File
Hello everyone;
If you are looking for an easy and automatic method to create a bootable USB or ISO file of windows 10 or Windows 11 image, then you are on the right place.
On this topic, you will learn you how to make a bootable Windows Pre-installation Environment (WinPE) or Windows Recovery Environment (WinRE) media automatically using CMD batch file. This Windows media could be either a bootable USB drive or an ISO image of windows 10 or windows 11 or another windows OS.
Read this topic if you want to create the bootable Windows PE media manually.
If you want to create a bootable USB using my customized Windows 11 recovery ISO file, then read this topic.
- Downloading the Required Files and Add-ons:
- How to Use the Auto CMD Batch File to Make a Bootable Windows PE/RE Media?
- How to Create an ISO File Using the Default WinPE Boot File?
- How to Make a Bootable USB Using the Default Windows PE Boot File?
- How to Make a Bootable Media for Windows Installation and Recovery?
- How to Create a Bootable Windows Media for Boot Recovery Only?
- TROUBLESHOOTING ERRORS:
- VIDEO:
Downloading the Required Files and Add-ons:
- Download the Create-WIM-ISO-or-USB.zip file from this link and then extract it into your computer.
- To use this automatic batch file, you have to download and install the Windows Assessment and Deployment Kit (ADK) tools and Windows PE Add-ons to your computer. For more details about how to download and install them, read this topic.
- You will need also to download the ISO file of windows 10 or windows 11. This ISO file can be used to customize the WinPE image by extracting the WinRE.wim or Install.wim file of a specific Windows edition into the working folder of the bootable media.
- Once the downloading completed, double click the ISO file of windows to mount it as a virtual drive.
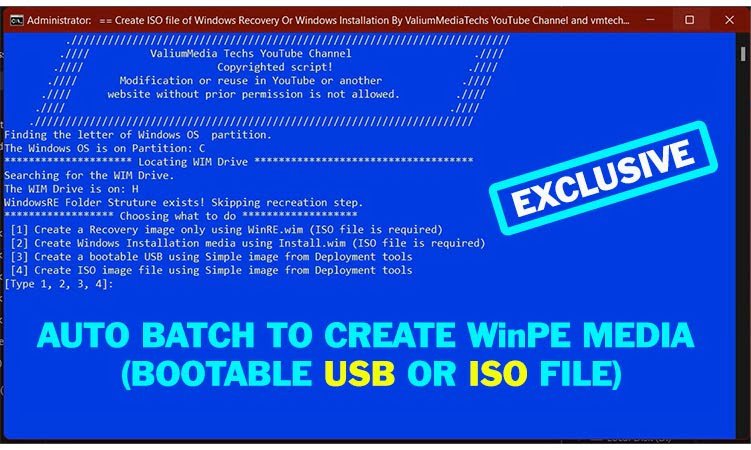
How to Use the Auto CMD Batch File to Make a Bootable Windows PE/RE Media?
- To use the auto batch script, do the followings:
- Right click the Create-WinRE-or-WIM-By-VMTechs.bat file and select Run as Administrator option.
- When you run the file for the first time, it will create a folder structure for Windows Pre-installation or Windows Recovery Environment. But when you run it for the second time or if you created the folder manually before, you will go directly to this options menu.
- Once the menu options appears on the CMD Console, you can type any number from 1 to 4 and then press enter to start the corresponding process to the typed number.
Note: As shown on the first and second options, if you want to use WinRE.wim or Install.wim in the bootable media, then you have to mount the ISO file of windows 10 or windows 11. But if you want to create a simple windows PE media using default default files, then you don’t need to mount the ISO file of windows OS.
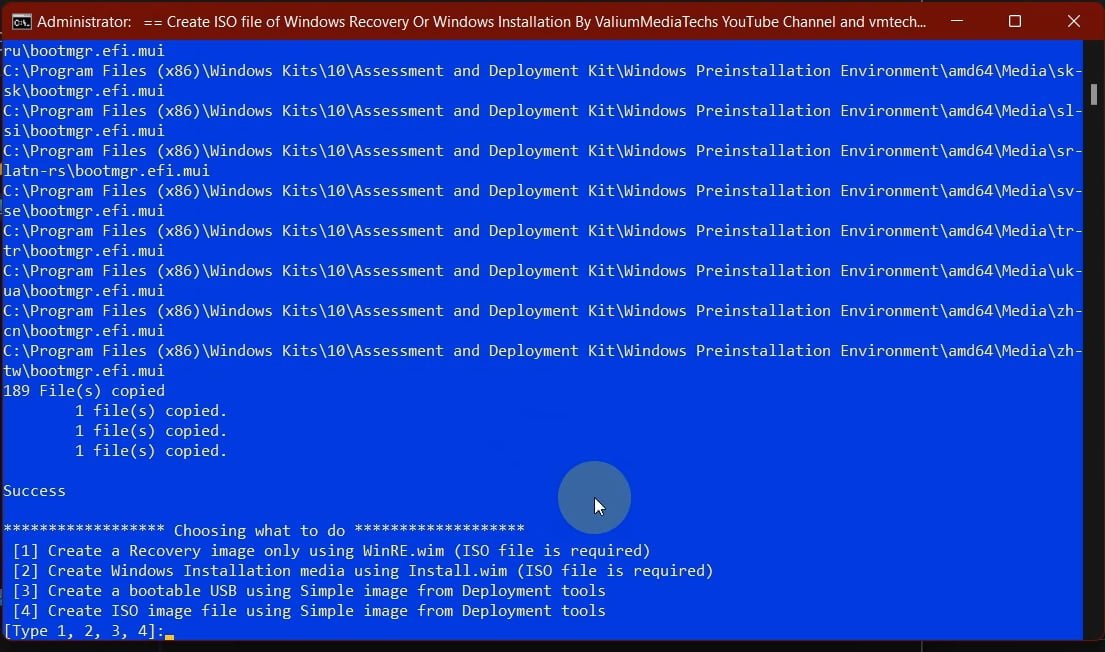
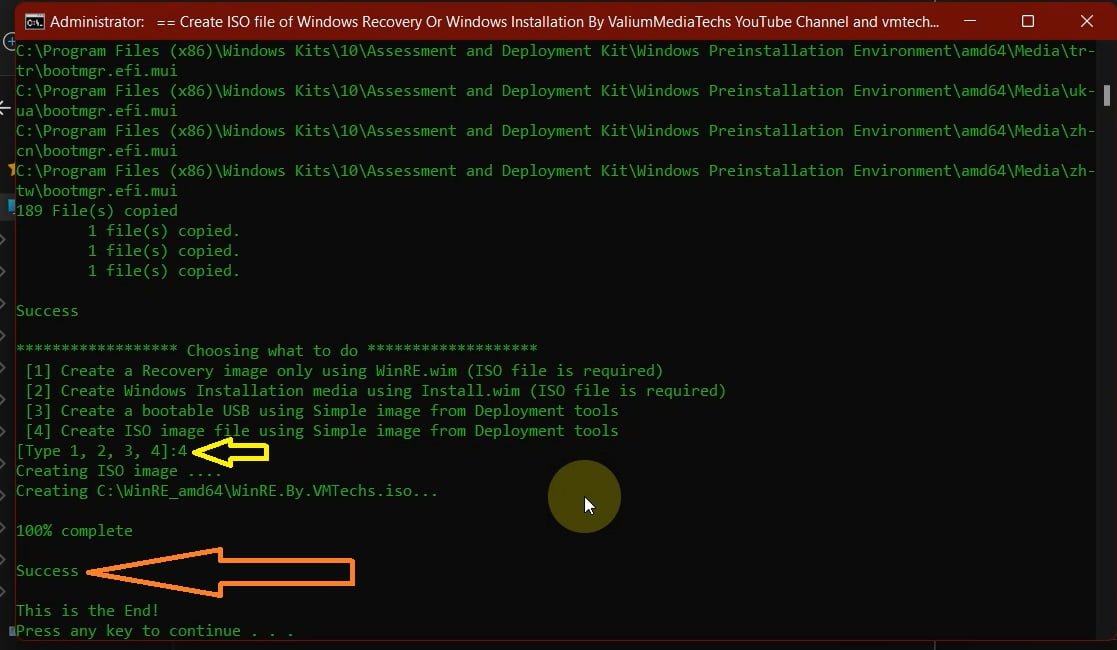
How to Create an ISO File Using the Default WinPE Boot File?
To create a simple ISO file using the default boot files of the Windows PE, type 4 and press Enter to start the process.
The ISO file will be saved to this path: C:\WinRE_amd64\
How to Make a Bootable USB Using the Default Windows PE Boot File?
- If you want to burn the default Windows PE image into a USB drive directly, connect the USB drive to your computer. After that, type 3 and press Enter to start flashing process.
- If there is no USB drive connected to your computer, you will see this error message. So plug in a USB drive and run the file as administrator again.
- If you have 2 or more external drives connected to your computer including the Micro SD cards, the auto Batch will select the last one on the drives list. So make sure the selected drive is the correct one before answering Yes, because this process will erase everything inside the selected drive.
- If the process done successfully, you will see the success message as shown on the image below.

How to Make a Bootable Media for Windows Installation and Recovery?
- If you want to create a windows installation media to install windows or to replace the corrupted system files, then type 2 and press Enter.
- If you want to copy the entire Install.wim file with all windows editions, type 1 and press Enter
- But if you want to extract only one windows edition such as windows professional or home edition, then type 2 and press Enter.
- If you have selected the second option, the list of available windows editions in the mounted ISO file will be shown, so you can type the index number of the desired edition and then press Enter to extract it into the working folder.
- After extracting the desired edition, you will be asked to either create an ISO file or to burn the image into the USB drive, so type 1 or 2 and press Enter according to what you want.
- If you want to burn the image into another USB drive, type N or NO and press Enter to show all available external drives. Type the letter of the USB drive that you want to flash the image into it and then press Enter to continue.
How to Create a Bootable Windows Media for Boot Recovery Only?
- If you want to create a bootable USB or an ISO file that contains the Windows Recovery Environment only, then type 1 and press Enter.
- The auto batch will extract the WinRE.wim file from the mounted ISO file of windows into the working directory using 7zip app, so the 7zip folder should be available on the same folder next to the Create-WinRE-or-WIM-By-VMTechs.bat file.
- You can select the first or second option to create either an ISO file or to burn the customized image directly into the USB drive. This bootable image can be used to repair windows start-up or boot failure, but can’t be used to install windows.
TROUBLESHOOTING ERRORS:
1. How to fix this ERROR : Failed to format “j:”; DiskPart errorlevel -2147024809:
- This error may appear while creating a bootable USB drive due to bad disk formatting.
- To fix that, Run the CMD as Administrator and then format the USB drive using these commands:
- DISKPART
- LIST DISK
- SEL DISK x
- Replace the X with the USB Serial number
- CLEAN
- CREATE PART PRIMARY
- FORMAT QUICK FS=NTFS LABEL=VMTECHS
- OR
- FORMAT FS=NTFS LABEL=”VMTECHS”
- ASSIGN
After that, run the auto batch file again and flash the image into the USB drive.
2. How to fix this ERROR: Failed to set the boot code on g:?
- This error may appear due to the antivirus app prevent the bootect.exe tool from accessing the USB partition.
- To fix that, disable antivirus temporarily and then try again, or open Windows Security Notifications from notification area and then allow the bootsect to access the USB drive sectors.
3. How to fix this error: File creation error – The parameter is incorrect?
If you get an error message saying that the “File creation error – The parameter is incorrect“, followed by this one “ERROR: Failed to copy files to h:”, then that mean the Install.wim file is larger than 4 gigabytes, which is the upper limit for the fat32 file system format.
- You can fix that by one of the following suggestions:
- Format the USB drive in NTFS file system as followings:
- Right click on the USB drive and then select Format option.
- Change the file system to NTFS
- Click Start icon to start formatting the USB drive in quick mode
- Try to connect the USB drive into another USB port
- Format the USB drive using DISKPART as shown previously.
- Create an ISO file and then flash it into the USB using Rufus pc tool or Ventoy mobile app.
- Format the USB drive in NTFS file system as followings:
- after each suggestion, try to flash the Windows PE image to see if the issue fixed or not.
VIDEO:
For more details about making a bootable windows PE media (ISO or USB), watch this video to see all methods step by step: