How to Upgrade Windows 10 to Win 11 on Unsupported PC Without Losing Data

On this topic, I will show you how to update windows 10 to 11 in any computer without losing data or files with free activation activation in supported and unsupported hardware.
As you know, there are 8 minimum requirements for windows 11, but the TPM and UEFI with secure boot are the most common obstacles in older computers. Other requirements in relation to Processor, RAM, and storage are nearly available in all computers or at least can be upgraded easily.
Minimum requirements for Windows 11:
- Processor: 1 gigahertz (GHz) or faster with 2 or more cores on a compatible 64-bit processor or System on a Chip (SoC)
- RAM: 4 gigabyte (GB)
- Storage: 64 GB or larger storage device
- System firmware: UEFI, Secure Boot capable
- TPM: Trusted Platform Module (TPM) version 2.0
- Graphics card: Compatible with DirectX 12 or later with WDDM 2.0 driver
- Display: High definition (720p) display that is greater than 9” diagonally, 8 bits per color channel
- Internet connection and Microsoft accounts:
- Windows 11 Home edition requires internet connectivity and a Microsoft account to complete device setup on first use.
This topic will help you to get rid of all these requirements in order to upgrade to windows 11 on any computer step by step, so you can enjoy windows 11 new features even in an old computer.
Download Windows 11 ISO file:
- Open the official Microsoft website of Windows 11 to download the ISO image
- Scroll down to Download Windows 11 Disk Image (ISO) section
- Click on Select Download and select Windows 11 Multi-edition ISO, after that Click Download
- Select the desired language and then click on Confirm
- Click on 64-bit Download to start downloading Windows 11 ISO file.
- Notice that there is no option to download windows 11 in 32-bit version, as windows 11 not officially supports this type of processor.
After downloading the ISO file of windows 11, let’s see how to upgrade windows 10 to windows 11 on supported pc in the next part.
how to upgrade windows 10 to windows 11 without losing data:
If you have a supported computer and supported hardware, you can upgrade windows 11 from windows 10 easily as followings:
- Double click the ISO file to mount it
- Double click the Setup file to start windows 11 upgrade from windows 10
- If you want to install drivers and other windows updates while upgrading, click Next directly, otherwise, click on Change how Setup Downloads Updates and then select, Not Right Now option.
- If you have installed ISO file in a language that is different from the default UI language, you will receive a message to inform you that the language will be changed after this upgrade.
- Click Ok to continue.
Click Change what to keep option to change whether to keep or to delete apps and or files, otherwise, click on Install to start windows 11 upgrading process, keeping Personal files and apps.
As you will see on the video below, the setup wizard automatically selected to install Windows 11 Home Single Language from available windows editions on the ISO image, as this is the activated edition of windows 10 on my computer. So don’t worry about activation too, as the setup wizard will use your windows 10 license key to activate windows 11 automatically.
how to upgrade windows 10 to windows 11 on unsupported hardware?
If your computer doesn’t meet windows 11 requirements, you will receive an error message saying that: “This PC doesn’t currently meet Windows 11 system requirements”. or “This PC Can’t Run Windows 11“
So, don’t worry, as you can fix that by replacing the appraiserres file in the Sources folder of windows 11 as followings:
- Back to the download folder and then unmount the ISO file of windows 11 if already mounted.
- Extract the ISO file using WinRAR or another app
- Download appraiserres.zip file from this direct link and then extract it
- Copy the appraiserres file into Sources folder inside windows 11 folder and replace the existing file.
- Back to the main directory of windows 11 folder (i.e. the extracted folder).
- Double-click the Setup.exe file to start installation wizard
- As you will see on the video, checking for requirements step will be passed successfully after replacing appraiserres file.
- Click Change what to keep hyperlink to change whether to keep or to delete apps and or files, otherwise, click on Install to continue.
As you will see on the video, windows 10 updated to windows 11 successfully in unsupported hardware. Microsoft recommend against upgrading to windows 11 in unsupported PCs, because you may not receive some security updates as stated on Microsoft Website. However, new windows 11 features insists users to upgrade.
New update:
- If the manual replacing the appraiserres.dll not helped to bypass TPM, Secure Boot and CPU restrictions, you can do the followings:
- Download the Rufus tool from this link and start it
- Connect an empty USB drive to your computer and make sure it is the selected one in the Rufus tool if you have more than one USB connected to your PC.
- Click on Select icon to load the ISO file of windows into the Rufus tool
- Once everything get ready, click on Start icon to start creating a bootable USB.
- Make sure that the both Remove Requirements options are checked according to your restriction.
- After that, click on Ok to continue
- Read the next warning message in the Rufus tool interface carefully, to be aware that everything inside the USB will be lost permanently after this step.
- Once the bootable USB created successfully, navigate to the USB drive and then run the Setup.exe file to start upgrading your system normally without errors.
Important notes:
- Windows 10 files are stored in folder called Windows.old inside C folder.
- This folder will persist for the next ten days, to help you go back to windows 10 if you faced any incompatibility errors or whatever, that make you decide to leave Windows 11 back to windows 10.
- On the first 10 days of your evaluation or usage for windows 11, don’t try to do a disk cleanup, defragment or another action on system files, otherwise, you will fail to revert your windows back to windows 10 if you decide to do so.
- After 10 days, Windows.old will be removed automatically. If not removed, you can remove it manually if you want.
How to remove windows.old folder of windows 10 after upgrading to windows 11?
- Type CLEANMGR into search box and open Disk Cleanup tool
- The tool will open with the C as the selected partition by default. But you may need to select the C partition or another partition that has windows logo manually then click Ok.
- Click on Cleanup System files option and reselect Windows partition again then click Ok
- Check all options then click Ok to remove junk and temporary files.
VIDEO:
To show all mentioned methods in upgrading windows 10 to 11, we have created a video with detailed illustration and step by step:
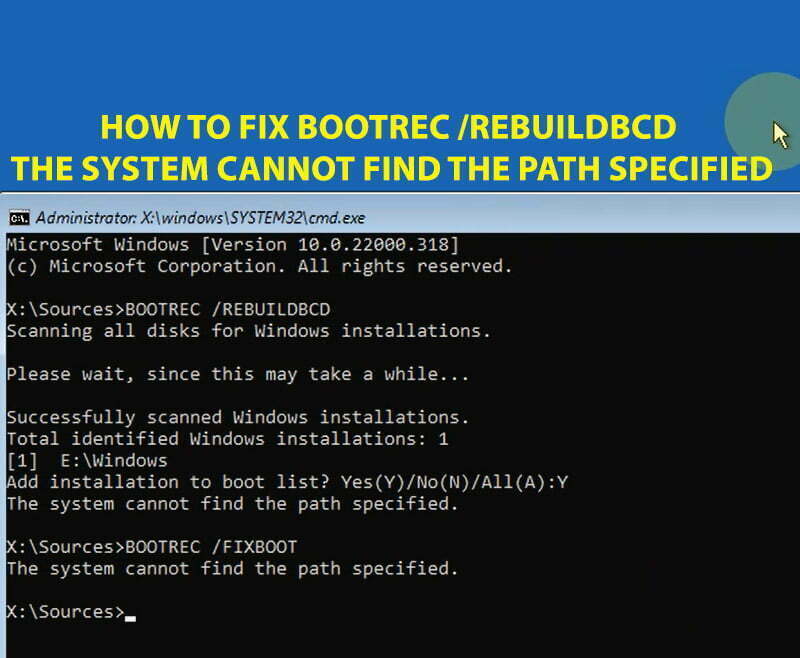
How to Fix BOOTREC REBUILDBCD The System Cannot Find the Path Specified in Windows 10/11

How to Install Net Framework 3.5 Includes .net 2.0 and 3.0 on Windows 10 Offline Installer Without CD
